CAT ADMINISTRATION
Chapter 4. MARC IMPORT AND EXPORT
Mapping Locations
The Modify Location/Collection Table function lets you map locations data contained in MARC records to be uploaded to the appropriate location/collections used by your library. You may also edit the parameters for an existing location map or delete an existing location map from the location table.
NOTE: The Modify Location/Collection Table link is active only when values have been mapped for Location.
To add a location map:
- Access the Import Items Setup screen for the Item Generation Setup for which you wish to map locations (see Entering and Editing Import Item Generation Parameters for details).
-
Click the Modify Location/Collection Table link.
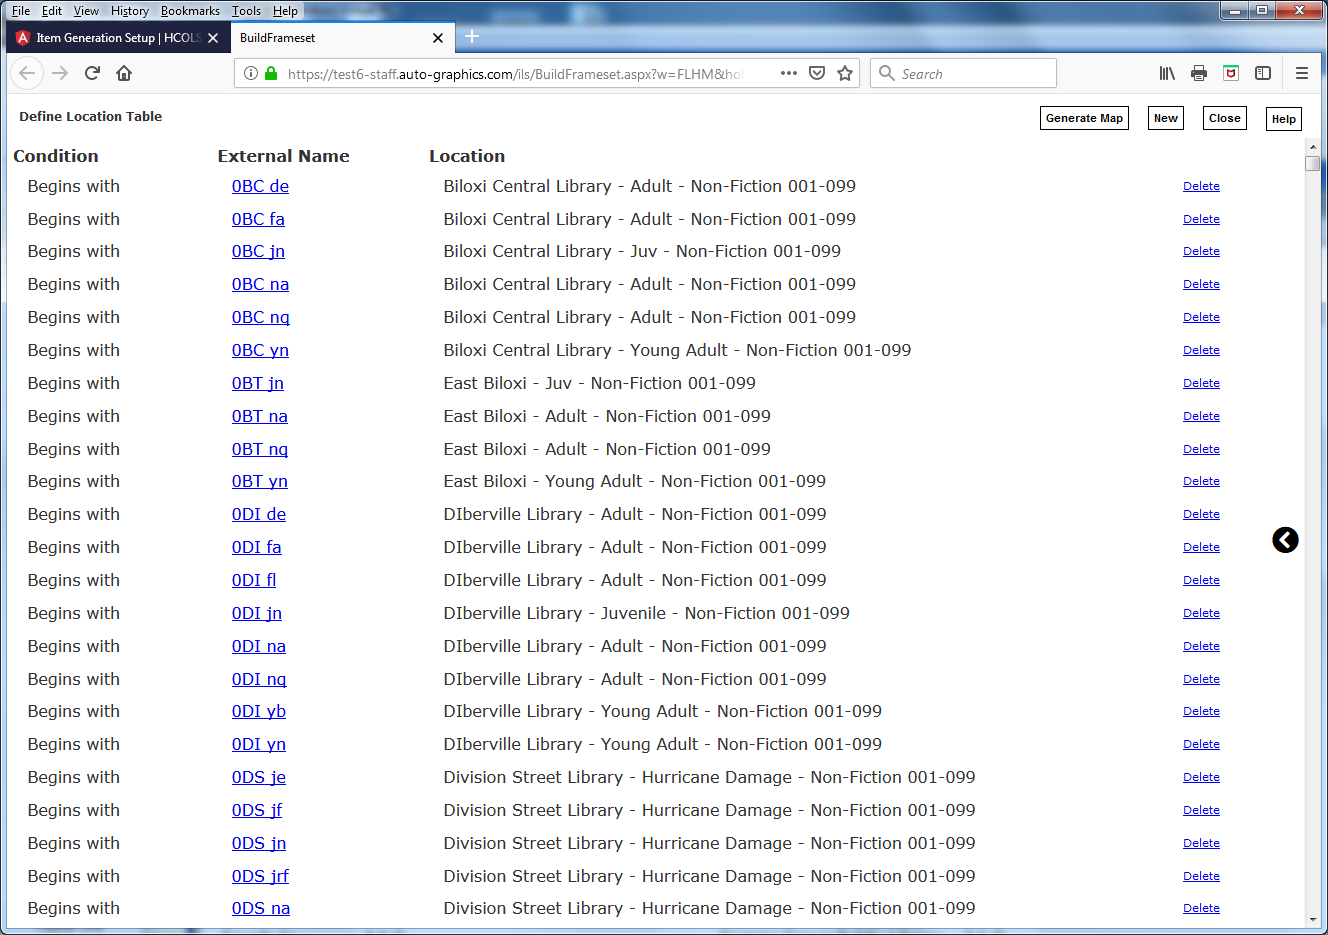
- The Define Location Table screen displays in an additional browser window or tab.

Define Location Table Screen
- The screen lists all currently defined location maps for the associated Item Generation Setup, in alphabetic order by External Name. Each line in the listing shows:
- the Condition (matching type) for the mapped location
- the text string in the imported record against which to perform the match (External Name)
- the library Location to be applied to records matching the specified criteria
NOTE: When creating a new Item Generation Setup, the Define Location Table will initially be blank.
- If desired, click the Generate Map button to generate a default location table based on all currently defined locations for your system.
- Click the New button to define a new mapped location for the associated
Item Generation Setup.
- The Define Location Mapping screen displays in an additional browser window.
Define Location Mapping Screen
- Define the External Location Name (the location specified in the records
to be imported under the associated Item Generation Setup) for the location map:
- Select the appropriate matching criteria from the External Location Name
menu, as follows:
- Equal to a positive match will be determined if the external location is an exact match to the specified text string.
- Begins with a positive match will be determined if the external location begins with the specified text string.
- Ends with a positive match will be determined if the external location ends with the specified text string.
- Contains a positive match will be determined if the external location includes the specified text string.
- Enter the text string against which the match will be made in the External Location Name text box.
- Select the appropriate matching criteria from the External Location Name
menu, as follows:
- Select the internal location that should be applied to records that are a
positive match to the specified External Location Name from the
Location Mapping
menu.
- The Location Mapping menu lists all currently defined locations for your system.
- Indicate whether or not you wish to Override material type mapping for
items matching the specified location map by selecting the Yes or No radio
button, as appropriate.
- If the Override material type mapping Yes radio button is selected,
choose the material type to be applied to items matching the specified location
map from the Material (Format) Type menu.
- The Material (Format) Type menu lists all currently defined material types for your system.
NOTE: The Material (Format) Type menu is active only when the Override material type mapping Yes radio button is selected.
- If the Override material type mapping Yes radio button is selected,
choose the material type to be applied to items matching the specified location
map from the Material (Format) Type menu.
- When all appropriate information has been entered, click the Submit button
to save the location map.
- The Define Location Mapping screen closes automatically, and the Define Location Table screen refreshes to display your changes.
- Repeat steps 3 through 7 to define additional location maps.
To edit a location map:
- Access the Import Items Setup screen for the Item Generation Setup for which you wish to edit location maps (see Entering and Editing Import Item Generation Parameters for details).
- Click the Modify Location/Collection Table link.
- The Define Location Table screen displays in an additional browser window or tab.
- Click the External Name link for the location map you wish to edit.
- The Define Location Mapping screen for the selected location map displays in an additional browser window.
- Edit the parameters for the location map as desired.
- When all desired changes to the location map have been made, click the Submit button to save your changes.
To delete a location map:
- Access the Import Items Setup screen for the Item Generation Setup for which you wish to delete location maps (see Entering and Editing Import Item Generation Parameters for details).
- Click the Modify Location/Collection Table link.
- The Define Location Table screen displays in an additional browser window or tab
- Click the Delete link for the location map you wish to delete.
- A confirmation dialog displays the message Are you sure you want to delete this record?
- Click the OK button to delete the location map. (Click the Cancel button
to cancel the deletion and leave the location map unchanged.)
- The Define Location Table screen refreshes with the deleted location map removed from the list.
- Repeat steps 2 and 3 to delete additional location maps.