![]()
PAC ADMINISTRATION
Chapter 2. SCOPING
Copying Scoping Assignments
You can copy the current scoping assignments from one scoping level to another existing scoping level, or, you can use the current scoping assignments from one scoping level to create a new scoping level. You may also choose to rename an existing scoping level when copying scoping to that level.
NOTE: If you choose to copy scoping from a selected scoping level (source) to an existing scoping level (target) to which one or more libraries / locations are currently assigned, the current scoping for the target scoping level will be overwritten with the values from the source scoping level.
To copy scoping assignments:
- Access the View Scoping screen for the scoping level from which you wish to copy scoping assignments (see Viewing Library / Location Scoping for details).
- Click the Copy Scoping button.
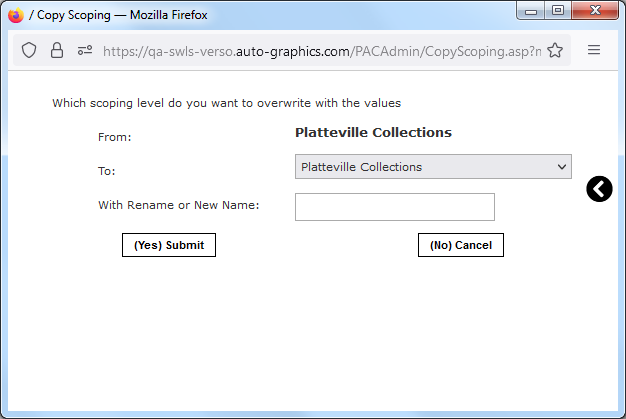
- The Copy Scoping screen displays in an additional browser window.

Copy Scoping Screen
- The From field (source) shows the scoping level from which scoping assignments will be copied.
- Select the scoping level to which you wish to copy scoping values (target)
from the To menu.
- To copy scoping values to an existing scoping level, select the desired
scoping level from the To menu. The To menu lists all currently defined scoping
levels.
- If you wish to rename the target scoping level when copying scoping, enter the desired new name in the With Rename or New Name text box. To leave the name of the target scoping level unchanged, leave the With Rename or New Name text box blank.
- To use the scoping assignments from the source scoping level to create a
new scoping level, select New Level (number) from the
To menu. The available New
Level (number) options will vary depending on the number of scoping levels
currently defined.
- Enter a name for the new scoping level in the With Rename or New Name text box.
NOTE: If you do not enter a name for the new scoping level, the message "Please enter a new name" displays when you submit your copy request. Click the Go Back button to return to the Copy Scoping screen and enter a name for the new scoping level.
- To copy scoping values to an existing scoping level, select the desired
scoping level from the To menu. The To menu lists all currently defined scoping
levels.
- Click the (Yes) Submit button to submit your copy scoping request. (Click
the (No) Cancel button to cancel the copy operation and return to the previous
View Scoping screen).
- The Copy Scoping screen closes automatically, and the scoping values from the source scoping level are copied to the target scoping level.