![]()
PAC ADMINISTRATION
Chapter 2. SCOPING
Setting Scoping for a Selected Library / Location
You can assign a selected library to multiple scoping levels simultaneously from any View Scoping screen (see Viewing Library / Location Scoping for details) or any View Location Groups screen (see Modifying Location Group Headings for details).
To set scoping for a selected library (RESEARCHit/SHAREit):
-
From a View Scoping screen or View Location Groups screen, click the name
of the library for which you wish to set scoping.
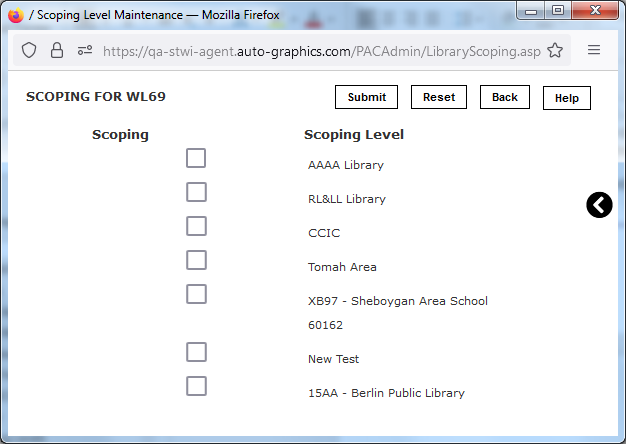
- The Scoping for (library code) screen displays in an additional browser window.

Scoping for (library code) Screen
- The screen lists all currently defined scoping levels.
- Use the Scoping checkboxes associated with each listed scoping
level to assign the currently selected library to the desired scoping level(s).
- A checkmark
indicates the associated library is a member of the currently selected scoping level.
- An empty checkbox
indicates the associated library is not a member of the currently selected scoping level.
- Clicking a checkbox repeatedly will toggle it on and off.
- A checkmark
- When all desired scoping level assignments have been made, click the Submit button to submit your changes.
- Click the Back button to close the Scoping for (library code) screen and return to the previous screen.
To set scoping for a selected location (VERSO):
-
From
a View Scoping screen or View Location Groups screen, click the name of the
collection for which you wish to set scoping.
- The Scoping for (location name) screen displays in an additional browser window.
Scoping for (location name) Screen
- The screen lists all currently defined scoping levels.
- Use the Scoping checkboxes associated with each listed scoping
level to assign the currently selected library to the desired scoping level(s).
- A checkmark
indicates the associated library is a member of the currently selected scoping level.
- An empty checkbox
indicates the associated library is not a member of the currently selected scoping level.
- Clicking a checkbox repeatedly will toggle it on and off.
- A checkmark
- When all desired scoping level assignments have been made, click the Submit button to submit your changes.
- Click the Close button to close the Scoping for (library code) screen and return to the previous screen.